How to Use and Organize Your Tasks in Microsoft Outlook’s Calendar Board View

Microsoft Outlook, on the web, lets you organize tasks, notes, files, and more. Tied to your main Outlook calendar, here’s how to get started on organizing your plans, projects & more!
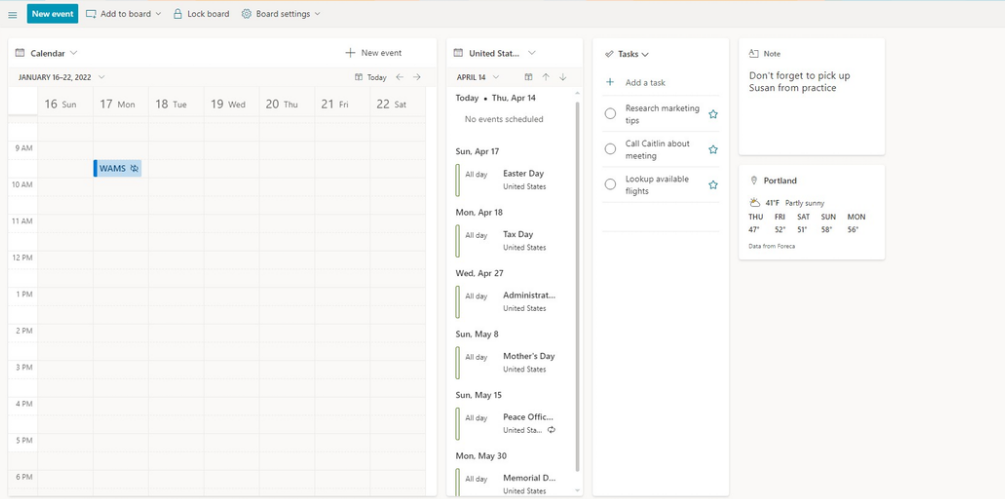
The new Outlook calendar view, only available on the web, helps you visualize your tasks and projects. With this easy-to-use tool, you can arrange tasks into cards to reflect different stages of progress, such as “To Do,” “Doing,” and “Done.” To create a task list in the board view, drag and drop tasks from another area in Outlook Calendar, Outlook Tasks, or add them to the Overflow section. You also can pin calendars, notes, links to websites or documents, and other items onto a board.
What to learn how to use the calendar board feature in Outlook for the web? Check out our beginners guide below.
Access the Outlook Calendar Board
- Go to your Outlook home screen in your web browser, which may be at outlook.office.com or outlook.live.com, depending on whether you have a Microsoft 365 subscription or a free account.
- In the toolbar running down the left edge of the page, click the Calendar icon.
- On the upper-right corner of the Calendar page, click the Month button.
- From the drop-down menu that opens, select Board.
Pin Cards to Your Board
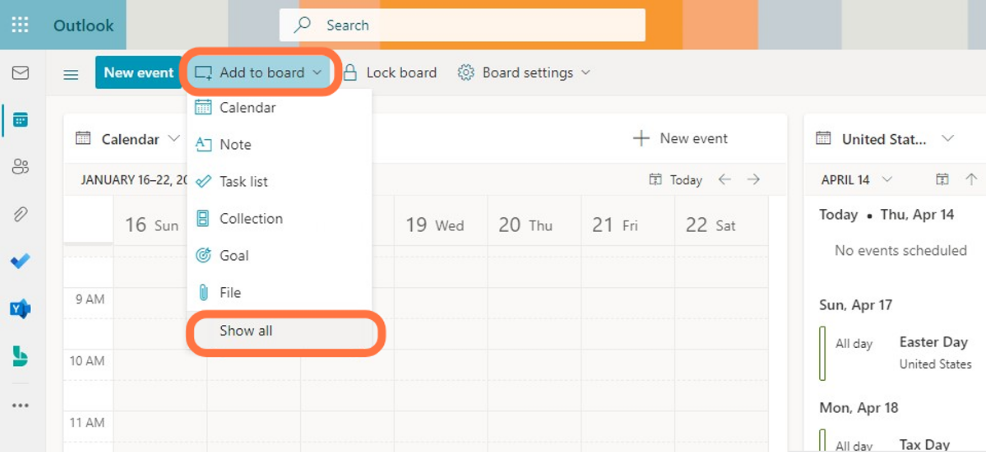
- Toward the upper-left of your Outlook Board home screen, click Add to board.
- From the menu that opens, select the type of card you want to add to your board.
- Select Show all to see several more types of cards. The types of cards you can pin to your board are: calendar, task list, notes, weather and clock, goals, link and files, and location, person, collection.
- Once you’ve selected a card type, the card will appear on your board.
- Repeat the process to add more cards. As you keep adding cards, each one will appear in an empty space on the board. Note: You can add several of the same type of card to your board. This means you can have multiple calendars, notes, files, etc. pinned to your board.
Change Your Card’s Layout, Appearance and More
If you don’t like the layout of your board, you can always move the placement and adjust the size of the cards.
To move any card to another place on your board:
- Click the card so that it becomes highlighted by a blue border.
- Click-and-hold an area toward the border of the card.
- Drag the card to another place on your board and let go to set it back onto the board.
Resize the cards for calendars, notes, and task lists:
- Move the pointer to a side or corner of the card until it changes to double-ended arrows.
- Click-and-hold and drag the arrows to enlarge or shrink the card’s size.
Navigate Your Board
To navigate your view of the board, click-and-hold an area of the board that is not covered by a card and drag the four-arrows (or grabbing hand) pointer so that you can see a different part of the board. A thumbnail will appear in the lower-right corner showing you the layout of the board and where you are on it.
Create Additional Boards
You can organize cards into multiple boards, and each board can contain different categories of information. For instance, if you are preparing to travel for work, you can create a travel board that contains all the information to prepare for your trip. You can also create a second board with all of your business contacts, so you have it all in one place when you need it.
To create another board:
- At the upper-right corner of the board, click Board.
- On the menu that opens, click the arrow to the right of Board.
- Select New board.
- Create a name for the new board.
- After you click Create, your Outlook board home screen will switch to the new board.
To rename or delete a board:
- At the upper-right corner of the board, click the board you want to deletes name.
- Click the arrow to the right of Board.
- Hover over the board’s name to reveal a pencil and trash can icon.
- To rename the board, click the pencil icon, type in a new name, and click Update. To delete the board, click the trash can icon.
